Sunday, April 1, 2012

Quail hutch


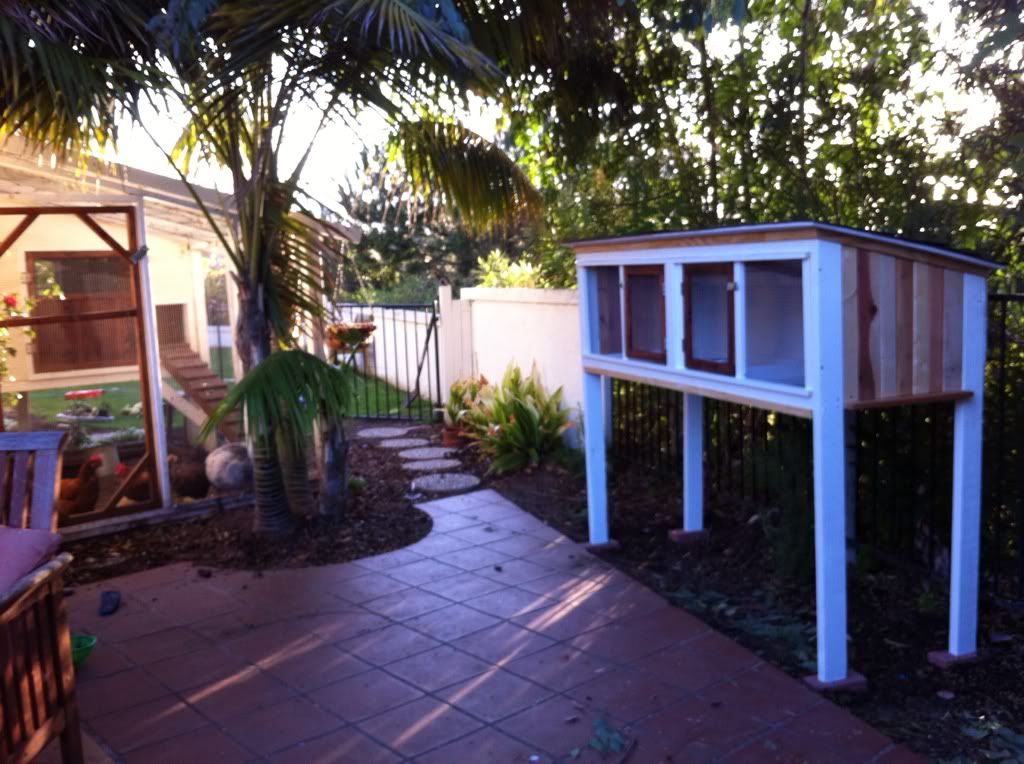
The quail hutch was a lot of fun to design and build because it was such a manageable size. I used up some old, spider ridden scraps of wood in the garage to make the siding, used an old can of bathroom paint an old wood stain for the paint and some extra hardware cloth left over from the chicken coop for the cage areas so it ended up being a relatively economical and eco-friendly project. The total was around $60, not bad! I think it looks nice with the chicken coop, don't you?

Friday, March 30, 2012

Plant markers


These were so easy to make and they will help me keep my tomato varieties straight. I'm so excited to plant my Spring/Summer garden so I can use them!
I got my inspiration from something I saw on Pinterest:
garden rocks
I wanted to show more of the natural colors of the rock because I love the way that tumbled rocks look after getting a shower from watering and I wanted to keep it more simple and easy to write heirloom names and paint over if needed the next season. On Friday, the kids and I went to the beach and collected the rocks, brought them home and washed them in vinegar. Once they were dry, I taped out squares on each of them with painters tape. After that, we painted them with non-toxic acrylic paint we bought from here.

Sunday, March 4, 2012

Picnic blanket


This weekend project was made possible by a great fabric sale I stumbled upon at Crate & Barrel outlet store. Their remnant fabric bolts that were originally $35 a yard was only 95 cents a pound! I bought about 6 pounds worth (probably around 10 yards or so), made a picnic blanket this weekend and have enough to make a matching lunch tote later.
I got the idea for this picnic blanket from the book, Sewing Green by Betz White:
Sewing Green: 25 Projects Made with Repurposed & Organic Materials
The book called for an old vinyl table cloth for the back and terry cloth for the front, but I didn't have a vinyl table cloth and didn't want to go out and purchase one. Instead, I used an old fleece blanket that we weren't using any more for the backing and my new Crate & Barrel fabric for the front.
I folded the blanket into fours, divided each quarter section by three and cut out my wedges to that size from my remnants. After cutting all the wedges, I sewed them together. Once the front was finished, I lined it up to the backing and worked on how I was going to get a perfect circle with the sunburst pattern centered. I decided to attach a safety pin to the center of the front face and a string (as long as the radius) attached and moved the string around the
blanket, cutting wherever the end touched.
For the binding, I just made some double bias tape to finish the project off. It was a beautiful day today, around 75 degrees and sunny, so we decided to use the picnic blanket today with a great picnic at the park down the street.


Monday, February 27, 2012

More balls...


They are so much fun to make, I can't help it! I am stock piling them for birthday parties of my son's preschool classmates.
See two posts down for directions. :)

Upcycled PJs

This weekend, one of the projects I worked on was my daughter's next size up pajamas. Ten to be exact. She has skin sensitivities and I only dress her in cotton and bamboo to sleep in. If I were to buy her a new set of PJs (10 in all) that were either Eima/Egyptian/organic cotton or bamboo, It would probably be around $300. using old yoga gear? It cost me zero.


Here's the clothes I started off with. Arm sleeves work wonderfully as pant legs up until about 24 months. For the pattern, I take an old, ratty pear of PJs, open them up at the seams and copy away.


Here are the finished products... The white PJ's got a little extra on the bottom with some machine embroidery in red since red, white, black combos are so popular this season.

Friday, February 10, 2012

Upcycled wool balls

I used old cashmere and wool sweaters for the outside and scraps of fabric from my discard bin for the stuffing. They are rather heavy for throwing, but my children have had a lot of fun making snowmen with them and rolling them around. Using traditional cotton stuffing would definitely make them lighter and very throwable, but this way, I used up the fabric scraps that would have been thrown away.
I created them using the directions I found here:

The ridiculously large beach bag

Project #4 (project 2 and 3 were design projects for my bedroom):
It's so big, it's quite ridiculous looking until it is filled with all the sand toys, towels and umbrella. I like that it holds everything so that my hands are free for holding my childrens' hands on the way down to the sand.

Book display shelves

This is project 1 of the year!
For P and J's room (so that they can see the front of their books and pick their books out easier since they are not old enough to read the book spine) I made them book display shelves.
They were about $22 to make all the shelves, not bad! Here's the link that inspired me to do it:


Here's how they turned out: